DIY | glam champagne glasses
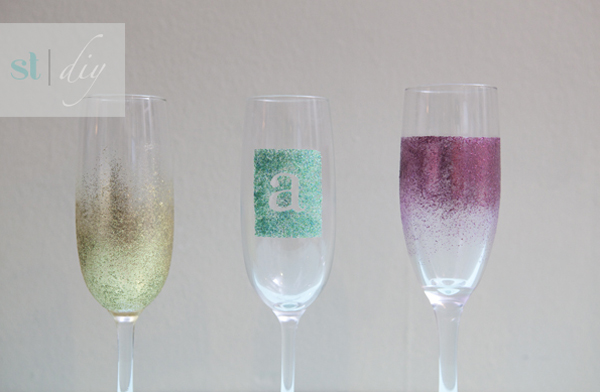
Looking for a fun way to personalize champagne glasses? Grab some glitter paint and lets go!!!
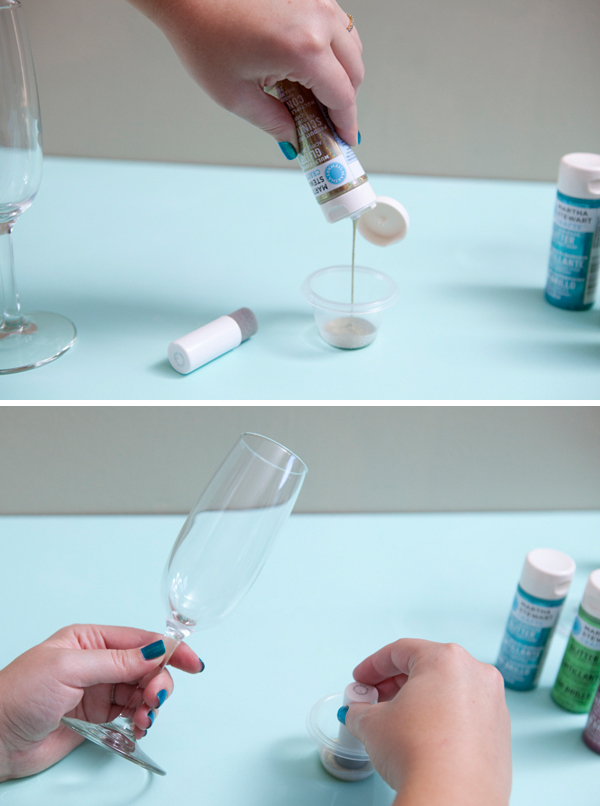
Supplies: Champagne glasses… Ikea, Cost Plus and Michael’s all have extremely inexpensive champagne glasses; Martha Stewart Mulit-surface Craft Paint in Glitter, your choice of color {my colors are: florentine gold, peridot + turquoise, and tourmaline}; my applicator of choice is also from Martha Stewart Craft’s line, the foam pouncers – so easy to use and so easy to clean!
Start by cleaning your glasses with alcohol and making sure they are completely dry before you start painting. Since we are using the Martha Stewart Craft Paint, after these glasses cure… they are dishwasher safe! As with all my DIY’s, if you create a project from one of my tutorials please email me pictures… I would love to see them!
Style 1: Gold Glitter. For the first design, I wanted to make the glitter look like it was sneaking up the glass from the base. So that is where we will start ‘pouncing’ the paint onto the glass.
Just keep dabbing and dabbing until a good coverage of glitter starts to develop. All three styles will need at least two coats of paint and at least one hour of drying time in between each coat.
Carefully twist and paint your glass. To get the look of the glitter fading up the glass, paint less towards the rim…
…and paint it more towards the base. I turned my glass upside down to make it easier to paint the base.
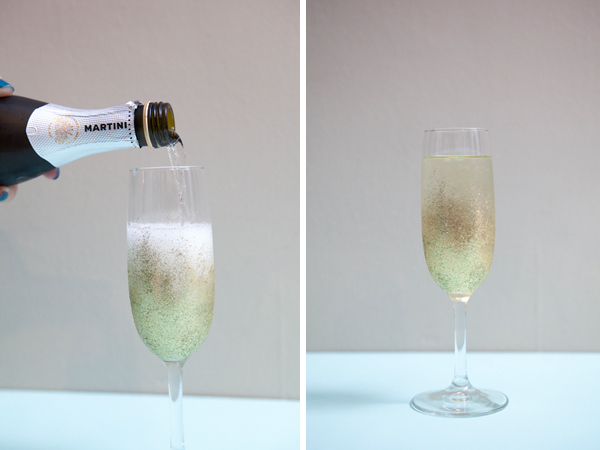
Add the bubbly and you are done! Remember, if you want to wash these glasses in the dishwasher you need to cure them using one of the techniques below. Also, paint should not be near where your lips will touch the glass, so try to keep the paint at least 3/4″ away from the rim of the glass.
OVEN CURE: this is the best method for glassware! Simply put your project into a cool oven on a baking sheet, making sure that no part of your project that has been painted is touching anything – the pan, the oven or each other {I put these glasses upside down on my cookie sheet}. Then turn your oven on to 350* and set a timer for 30 minutes. Your glass will not crack because it is cold and so is your oven, the two will heat up together – this is very important. Once the 30 minutes is up, turn off your oven and let your project cool down completely inside the oven. Then it needs to sit for 72 hours before you can use or wash it. This is the best method for this project.
AIR CURE: after painted, let your project air dry for at least 21 days – no using or washing. After the 21 days is up, it should be ready to use and wash. I do not recommend this method for this specific craft. The glitter paint does better with the oven cure method.
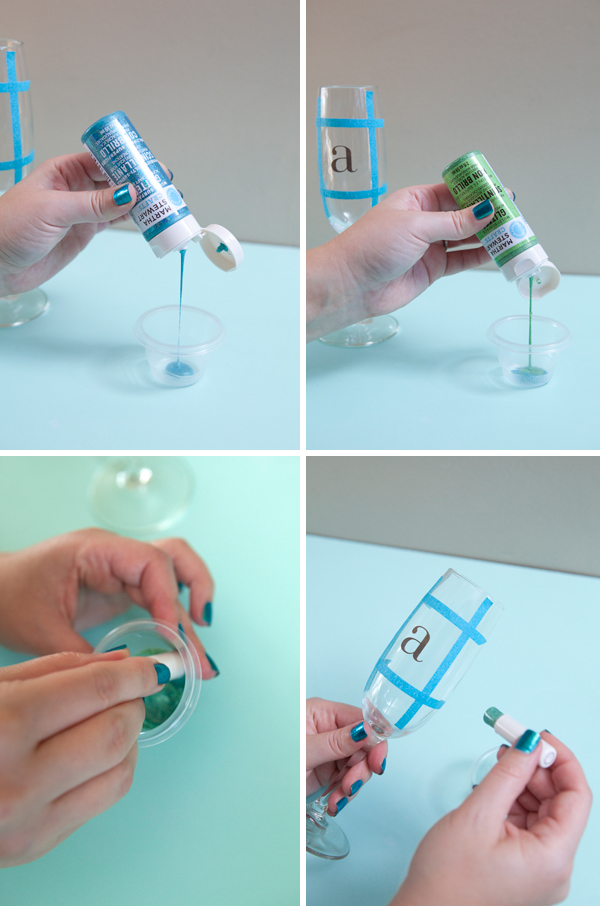
Style 2: Personalized Monogram Glass. If you read my DIY from last week I included a personalized champagne glass in the ‘will you be my bridesmaid?” box that I created… this is the glass from that box. In this example you will need letter stickers for your monogram. Start by choosing your letter of the alphabet and placing it on your glass, nice and firm.
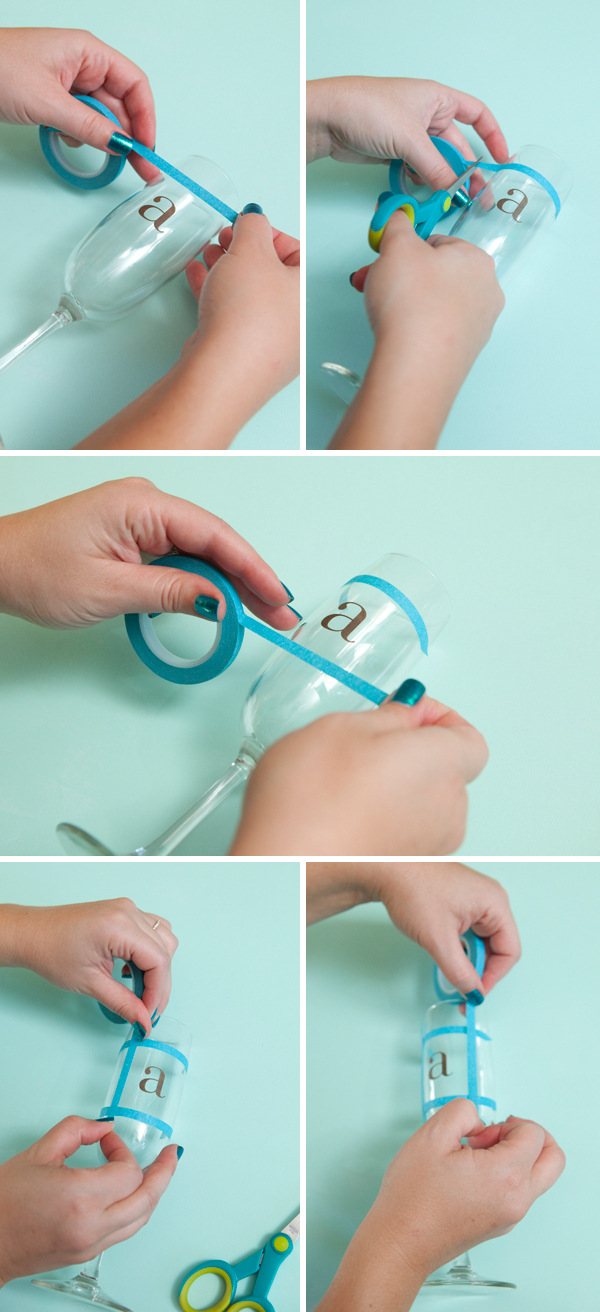
I wanted to create a box around my monogram so I taped it off using Martha Stewart Craft Paint Stencil Tape. Be careful with the curve of the glass, measure it out if you need to and don’t get discouraged if it takes you a few times to tape it off evenly. It is worth the struggle.
Since of course I wanted a more dimensional turquoise glitter paint, I mixed both blue and green together.
Then using my smaller size pouncer I started pouncing with my mixed paint. Since I wanted a really bold monogram square, I used three coats of paint, with an hour of drying time in between each coat. A good way to check the glitter coverage in this design is by taking a peak from behind.
Once the paint is fully dry, carefully pull the tape and the sticker monogram off. You might even want to softly slide an Exacto knife along the edge of your design and the tape to make a clean brake. If any edges pull up – push them right back down. If any paint bled under your monogram sticker, using your nail gently scratch it away. The paint will be permanent once cured. *Note: if you are using a swirly, thin edged type sticker – you might need to very carefully pull the sticker off before the paint dries, to ensure that the design shows completely and doesn’t peel the rest of the paint with it.
Cure your glasses and you are good to go! Isn’t is SO cute!!??
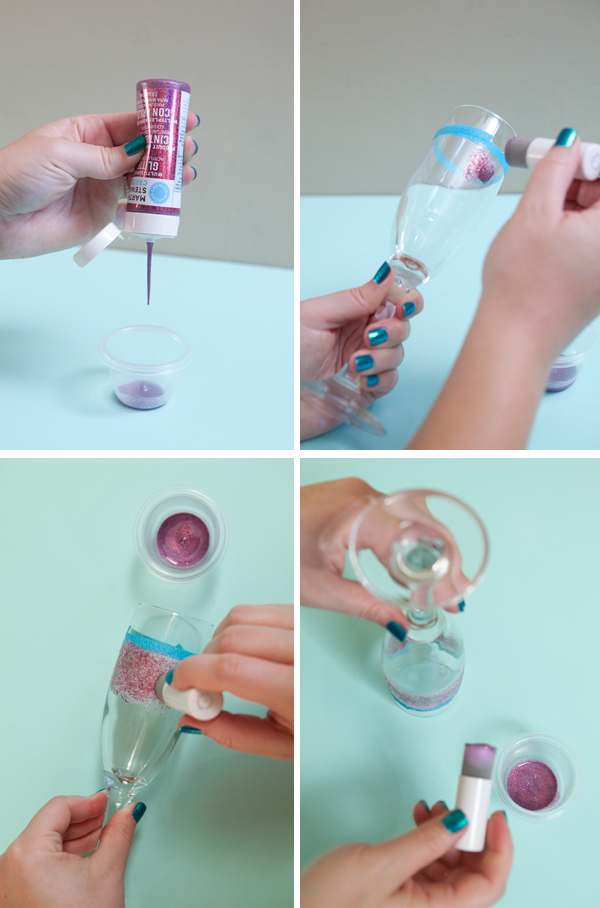
Style 3: Pink Glitter. For this design I wanted to create the opposite look of the gold glass… hot pink glitter sneaking down the glass away from the rim. Since the paint should be kept away from where you will sip your drink, I chose to start this design about 3/4″ below the rim. I taped my line using Martha Stewart Craft Paint Stencil Tape… be careful with the curve of the glass, it might take you a few times to get the tape line straight.
Again, using a pouncer start dabbing the glitter onto the champagne glass. I did two coats of paint, with an hour of drying time in between each coat.
Just like the gold glass, dab much more glitter paint onto the top of the glass and much much less towards the bottom of the glass. So that it looks as if the glitter is falling down the sides of the glass. When the paint is completely dry, remove the tape – you can even softly run an Exacto knife along your design and the tape for perfect tape removal.
The gold one is probably my favorite… but they are all SO cute and easy!
{DIY credits} photography: Studio 11 // DIY: Jen | Something Turquoise
Trackbacks
- Frosted Weddings » DIY Personalized Champagne Glasses
- featured on Martha Stewarts Crafts Dept. « Something Turquoise {daily bridal inspiration}
- Purple & Gold Wedding Inspirations & DIY Gold Sparkle Champagne Glasses Sparkle & Hay Wedding Blog
- Μετατρέψτε τα βαρετά απλά ποτήρια σας σε λαμπερά και μοναδικά | Γάμος και Οικογένεια | About Wedding
- Links Out | DianeTeall.com
- DIY Champagne Flutes « Life Under Construction
- Shimmery glasses for your bubbly –
- She’s Crafty: Glittering Champagne |
- Champagne & Glitter « nlzee
- Holiday Crafts: Champagne Glasses « The Art of Being Sedentary
- TOP 10 | DIY-ing your wedding « Something Turquoise {daily bridal inspiration}
- merriment 2.24.2012 | A Subtle Revelry
- will you be my bridesmaid? | BUCKETS AND BUNCHES
- What I Love Wednesday: Crafts « Snickerdoodle State of Mind
- Brindisi glamour | Fashion Bride
- {diy Wedding Projects} Shimmering Champagne Glasses | Becoming the Mrs.
- DIY | address numbers as table numbers « Something Turquoise {daily bridal inspiration}
- DIY Glam Champagne Glasses








ABSOLUTELY LOVE THIS IDEA! YOUR STEP-BY-STEP INSTRUCTIONS WERE VERY HELPFUL. KEEP THE IDEAS COMING!
Very cool, I like it.
what a great idea…. I love the gold one the best. Kind of holiday-ish as well.
Just found you and love this!!!!! I’ll let my girls (12 and 9) do this on some regular drinking glasses, they will love it!
These are so cute. I am making a modified version of your “will you be my bridesmaid” box and made these to put in! your website is wonderful, thank you for the cute ideas!
The best part about this tutorial is all the pictures, really! Sometimes in tutorials it seems like you go from photo to photo and wonder “wait, what happened in between those two!?” but this is just perfect and suuuuch a cute idea! Thanks!!!
I wanted to try and replicate what you did but it is not working too well. The extra glitter and excess white stuff is coming up on the glass. How do I prevent that? I am dabbing like you say but should I be rubbing it so the excess doesn’t show? Or should I just let it dry? I am so lost! Help! LOL
Hi Rachel. Try to dab your glasses as evenly as possible. You cannot use big lumps of paint – evenly coat the pouncer as well as the glass – it might be difficult if you are using a paint brush or a different type of tool. If you feel you are getting a large lump of glitter you can dab it towards the area that needs to be filled in. The ‘white’ is actually like a clear paint that the glitter is in. If you must see it dry – right away – try hitting it with your blow dryer for a few seconds. As soon as the paint is dry the white will go away completely. In one of my pictures with the pink glass, you can see the white before it is dry. If you are getting lots of white bubbles, that means your pouncer was wet when you combined it with the paint. Also, make sure you are using Martha Stewarts Glitter Craft Paint… no other paint will do! Hope this helps.
I have the pouncer and the martha stewart craft paint. I will try again tonight. Thank you! I will make sure to take pictures and let you know how it goes.
What nail polish is this??? it is gorgeous!!
Thanks! It is ‘Catch me in your net’ by OPI :)
Beautiful glasses! What stickers did you use for the monogram style? I can’t wait to make my own, but I can’t seem to find good stickers.. thanks!
Hi Melissa! You might want to look for stickers at a scrapbooking store, or in the scrapbooking section at Michaels. My stickers in the example are from a large scrapbooking company called Basic Grey. Good luck!
Thank you! :)
can you do this on plastic champagne flutes? or do they have to be glass ones? i wanted to do this for my nye party that i am hosting but do not have the $ to buy so many glass flutes.. thanks!
Hi Tai! Of course you can do it on plastic! …just let them dry for a few days and DO NOT put them in the dishwasher! haha! as I am sure you wont :) Send me pictures if you make them!
I Tried the gold design and the monogram on wine glasses I got at Dollar Tree. The monogram came out very nicely.
The gold however, I think is best for a champagne glass. When the wine glass is hanging upside down, it looks really great. But when held upright, the paint looks spotty. I think it’s that the wine glass curves differently than a champagne glass, which is more straight up and down, so the light hits it differently.
I’m going to try the pink idea, since I think it may work better with the roundness of a wine glass. I’m going to keep the gold glass, since it looks great hanging upside down on the wine glass rack :)
Thanks for the great idea! I will definitely be making some champagne glasses for my bridal party next year.
Hi Katrina! I’m sorry you had trouble with the paint on your wine glass. Try it again… making sure that you add thin layers of paint – all drying at least an hour before the next coat, and if glitter clumps in one area – do your best to push in around evenly with your pouncer. I did this project on wine glasses as well and had no issues. Also while painting, look through the inside of your glass to see where you need more glitter… it is easier to see that way while the paint is still wet. Good luck!
Ok, thanks! I’ll try it again.thanks for the tips!
Hello. Love this project. Thank you for sharing. Can you do the oven cure method on mugs? I bought some mugs to do this with my daughter as holiday gifts. We also bought glass ornaments to try on as well. Those won’t need to be cured though, right? Thanks :)
Hi Swankymommy! I’m not 100% sure about baking ceramic mugs. But, if you leave your comment on the post below, one of Martha Stewarts crafters will answer your question. http://thecraftsdept.marthastewart.com/2011/11/msc-paint.html
I Googled it and from what I have read it can be done! Excited. Thanks for answering me :)
Hi, do they still make this glitter paint? I can’t find it on their website. Thanks for the instructions!
Hi Jayme! YES! Martha Stewart Craft Paint is brand new and available exclusively at Michaels. Here is a link: http://www.michaels.com/Glitter-Paint/cp0473,default,pd.html?start=5&cgid=products-craftpainting-paint-marthastewartcrafts
I actually just bought 12 of them from HSN.com for $26, I got the “bright” collection and the colors are gorgeous! I might go back and get the “iridescent” paints too.
Hi! I love this idea!!! I’m hosting a NYE party and the vendor that was going to professionally print my flutes flaked at the last minute. I googled and found this wonderful idea. I read it quickly and ran to Ikea to get the flutes and to MIcheal’s to get the supplies. I finally sat down again to re-read the post to make sure I have all of the particulars and realized that I need to allow 72 hours after the curing before use… Is that a hard and fast rule? I plan to push to finish the painting today and hopefully cure them tonight (Wed) and need to use them Saturday evening. I plan to use window decals to personalize underneath the base and will need to handle them before Saturday to do that part. If it’s more like 48 hours will that still work? Thanks in advance for your help with this and for the amazing idea!
If these are going to be favors that you would like your guests to be able to wash and use again and again… the more time the better. Oven curing really does the trick and Saturday night is almost 72 hours away right? I think you should be fine :)
Is the curing only necessary if you want them dishwasher safe? If they aren’t cured would they be able to be handwashed without damaging the paint? Thank you!
You need to cure your glasses one of the two ways listed. Otherwise when you wash them the paint could start to peel off, especially the glitter type. I recommend the oven-cure method for any glass project because glass is such a slick surface and normally paint has a hard time adhering. For a ‘one use’ glass, you don’t need to cure it.
My friend and I followed your directions and used the same paints. We like the way they came out but I see what you mean about pouncing enough to move the paint around. The dark colors came out nice:
but the light frosted color was not very forgiving:
I hope the links work.
Also we put paint on the bottoms and we really like the way the glitter shows through.
Thanks!
So you can use cheap Ikea glasses for this? And they won’t crack in the oven? Also, I’d love to write on the glasses…is there a craft paint pen or something I could use?
Yes, cheap Ikea glasses work perfectly! I am sure there is a great paint pen that you can use – I just don’t know of any that will hold up as well as the Martha Stewart Craft Paints. Good Luck!
Oh my gosh! I love these! Can’t wait to make them for a gift for the girls in my bridal party! Do you think the curing method would be the same, for say, a glass beer mug? (Maybe as a groomsmen gift?)
Thanks for sharing! :)
I decided to try this for my Bridesmaids to use during my September wedding reception. The step by step instructions were perfect and the flutes turned out great!
I incorporate the initial idea into the first one shown with the glitter fading up and they still came out looking very good.
I used the Martha Stewart paints from Michael’s and downloaded the store’s app to my phone and got a 40% off coupon for my purchases. Which was a GREAT BONUS!
That with Libbey Champagne Flutes from Bed Bath and Beyond with another coupon the project cost me less than $20 for the four glasses I needed.
That is fantastic Breana!
Which shade of gold paint did you use?
Hi Kimberly! The gold paint I used is from Martha Stewarts line of multi-surface craft paint. It is called ‘florentine gold’.
Hi! I’m thinking about incorporating the initial idea a glass with the glitter floating up too, can you post a photo? I would love to see how it turns out! Btw, this is a GREAT idea! Definitely going to try this out!
Love this! Thanks :)
How do you know if the glitter paint can be cured?
Hi Britney! For this specific project I am ONLY recommending the Martha Stewarts Glitter Paint within her new line of craft paint – as pictured.
Hi there! These are amazing!! Just curious… How does the paint hold up under hand washing?
Thanks again! Can’t wait to try it!!! :)
Amanda
Hi Amanda! As long as you oven cure them as stated, they hold up great – I just don’t scrub the glitter area too hard!
I did this with a domed cake stand for my kitchen! It added so much character and have had so many complements on something that took so little time or effort!!!
I glittered 5 glasses last night and they turned out great until I went to pull the letters off. I put 3 coats of the Martha Stewart glitter paint on each glass and let then dry for 2 days. When I pulled the electrical tape and the letters off the paint would peel completely off. I tried going around the letters with a knife and even a needle but there was no saving it! I ended up peeling off every bit of paint and it looked like the glass had never been painted at all! I’ve seen another site that suggest using pva glue, regular glitter, and mod podge. I guess I will go peel all the paint off the glasses and start over! Hope this works out better for you guys than it did me!
Hi Cayla, sorry you had a rough time with your project. First, I don’t recommend using electrical tape – blue painters tape would work much better or the stencil tape that I use in my tutorial. You can also try pulling the tape and stickers off when the paint has dried for like a half hour – that way it isn’t completely hardened. It is also a must to clean and dry your glasses with alcohol before you paint. This is exactly what I did. I hope that this helps and that you try again :)
can you use any kind of craft paint . I don’t do martha stuart anything.
Not for this exact tutorial – I’m a huge Martha fan :)
I love this idea. I will be making these for my wedding.
I was wondering if anyone had tried mixing the gold design with the monogram design and if they had how it looked. I love these designs and I’d like to do something like the gold and monogram together for my wedding reception glasses.
Hi Melissa! I actually made one for a friend with the ‘fade up’ glitter design plus a monogram… I did it on a wine glass and it looks super cool when there wine in the glass. It looks nice sitting there too, but the monogram doesn’t stand out as much as it does in the original design because there is so much glitter all the way around the glass. Hope this helps!
Thanks! This helps a ton! It sounds like it would come out exactly as I want it to since I didn’t really want the monogram as dominating as the original design. Thank you so much for being experimental and doing this combo!
i was wondering can you use any kind of glass like mb a glass mug? or does it have to be a wine glass?
Hi Megan! It can be any type of glass! Candle holder, wine glass, coffee mug, vase… etc!
ok thank you!! i have 8 girls and i really like this idea!
I made mine last night. I will post pics after they are done in the oven. Few tips: I started my coats too thin so I had to do about 5 to get it as good as the above pics. You really must get the right tools. The pouncers are great. They are also at Michael’s for about $4. I used Florentine Gold and it looks good. Lapis Lazuli (Blue) looks great. Limeade is a little to light in color. The darker colors look the best. I will do wine glasses next. This was a great project. Most important: use the paint liberally…it shouldn’t have took me 5 coats :-) One more thing. I tried duct tape and that doesn’t work. You must use painters tape. If you follow her instructions…everything will go well.
Thank you so much for the feedback Amy, I appreciate it!
How well would this work on plastic champagne flutes? I thought this would be fun for a 60th birthday party but would need to do about 50 of them and cost wise plastic would be far better than glass.
Hi Christi! It is super easy to do this on plastic, same steps as above – obviously without oven curing them! Plastic would be more of a one time use kind of thing. I would check the price of glass at Ikea and Cost Plus, it might not be that much more than plastic :)
I couldn’t find the martha stewart paint so i used glitter glue… it looks great but do you know if it will melt when i put it in the oven to cure them?
Hi Jessie! The oven-cure method listed is ONLY for Martha Stewarts line of Craft Paint, sold at Michaels Craft Stores. I would definitely not oven-cure your glitter glue unless the directions approve using it on glass and oven-curing it. My favorite thing about Martha’s new line of craft paints is that it’s truly ‘multi-surface’, and can be oven-cured on glass to become dishwasher safe. For this exact project I DO NOT recommend any other paint. If you don’t have a Michael’s near you, they are also sold online here for $3.49 a bottle: http://www.plaidonline.com/martha-stewart-crafts-2oz-multi-surface-glitter-ac/146/32146/product.htm
How would you go about doing a monogram on these? Wouldn’t you need a sticker?
I’m going to make these as favors for my small wedding next month. I was thinking of putting these down and every guest can have a personalized favor as well as use them for the champagne toast. Do you have any ideas for how I can make these more “manly” for the male guests? The glitter is great for the females and i know Martha makes craft paint that comes in pearl and metallic but I’m not sure if it will transfer with the same effect. Any ideas?
Thanks and awesome website!
Hi Danielle! That is a tough one! The metallic might be a cool thing for the guys – it would work perfectly if you are doing the monogram version. You might want to use a paint brush instead of pouncers though… good luck!
These are beautiful!! I am thinking of doing the monogramed version on wine glasses for my best friend for her shower gift, for the wedding party to use at the reception. I don’t think so, but i wanted someone else’s opinion, but do you guys think that a green glitter on the glasses is too girly? I saw other paints on Michaels website but I’m worried the other paints won’t look as beautiful as yours :-) Thanks for the help!!
Ooops! I didn’t see Danielle’s comment before mine lol!
Hi Brittany! I think it all depends on the wedding… most guys won’t care what they are to drink out of – but I am sure that they won’t be drinking out of the same ‘favor’ glasses at home after the wedding. If you want the look for the wedding it’s one thing – making guys happy with glitter paint is another! haha!
I just loved this idea and tried it over the weekend. The letter ones turned out cute- but the gold climbing up the glass I have two questions about. The top of the glass that had less glitter- first I couldn’t get the top border even and didn’t like how visible the circles from the pounces were, and then the less glitter the more you can see the rest of the paint which seemed to dry funny and left the glass looking more dirty in that area. Do you have any suggestions? Or am I just being too critical (I tend to do that when it comes to things I’ve done.)
Thanks!
Hi Jess! You might be a little critical of yourself! Can you email me a picture of your glasses so I can instruct you further??
I did 3 coats of paint like you said and the blue painter tape and all of the letters peeled off, I used cursive letters do you think maybe they were too swirly and that is why? I tried using a razor blade along the letters also. Any suggestions?
Hi Jesse! Yes, you are correct – your stickers might have been too thin and swirly. The other day I tried it with really thin stickers and I *very gently* pulled the stickers off before the paint dried completely and it was much better – you just have to be very careful when pulling the stickers off that you don’t smudge your paint. Hope this helps!!!
Love these glasses, I actually got here from another blog that used modge podge and glitter. I was wondering of you think using modge podge and glitter but then using Martha stewarts craft paint to seal it and just hand washing them would work? The loose glitter is just so much more dazzling than the glitter craft paint…
Hi La, I don’t feel comfortable answering your question 100% because I haven’t actually tried that combo. Hand washing gently might be totally fine with the glitter and modge podge alone, if the other tutorial says it works – then it might! I completely agree – the loose glitter is gorgeous!
Love it! I am doing this for my bridesmaids. I just did a test run on one of them and so far it’s looking good! I’m wondering though–can I put five of these in the oven to cure at once? Would I still put them in and then turn it up to 350 degrees? Or should I only do them two at a time?
Hi Aly! Yes! You can cure as many at a time as you can fit in your oven :) Send me a few pics when you are done!
what did you use to apply the paint? it looks like a sponge but i wanted to make sure. so excited to try this!! thanks!!
Hi Karen, Foam Pouncers from Martha Stewarts Craft Paint line… there is more info about them written in the tutorial :)
thanks!! getting ready to cure my test project now!!
I made some martini glasses for my bridesmaids using your technique and they turned out great! Thank you for this wonderful tutorial! Here is a link to an image of one of the glasses! Thanks again!
Thank you Cassie! Send me a picture of your martini glasses – I’d love to see them!
I’ve purchased champagne glasses from dollar tree and had them etched with my bridesmaids name. Is it safe to use the glitter paint on the glass after it has been etched?
Hi Niki, I am sure they will be fine… I don’t see why not – but I’m not an expert on specialty etched glass! Maybe try to avoid the etched areas :)
In the process of waiting for the first coat to dry, and I’m wondering how you clean your foam pouncers? It’s like to use them for other colors but can’t seem to get all the glitter out. Thanks for this great tutorial!
Hi Nicole! All I did was run them under water, squeezing and squeezing the sponge out until the water ran clear. The sponge comes out of the white holder and it is best to clean them while the paint is still wet! Hope this helps :)
Did you use a certain type of letter sticker? The ones ive been trying out don’t stick once i put one coat of the glitter paint on. Any suggestions?
Hi Erica! I’m sorry you seam to be having trouble. I didn’t use any special type of sticker, if yours are slipping off after being painted they could either be: 1.old stickers, possibly with glue that isn’t strong anymore, or 2.not adhered correctly. Make sure to clean your glass before you apply your sticker and paint. Hope this helps!
Thanks for this great idea. I started a glass last night and thought I was doing it wrong because it wasn’t as dark as your examples. Good thing I read on to see it says “at least two coats” LOL. Well anyway….Thanks again. I can’t wait to see what my finished product looks like.
Thanks Jamie! Send me a picture of your project when your finished :)
This is the coolest thing ever I found this yesterday and went to micheals and bought everything and just finished one glass but not sure if I did it right cause I couldn’t find the same sponge u used
Any foam type brush used in a ‘pouncing’ motion will work just fine. I don’t recommend brushing it on with a regular paint brush. Because of the glitter in the paint you won’t get even coverage and it’s harder to fade the glitter up the glass using a regular paint brush. Hope this helps…
yes this project ws great..but i did mines last night so do i have to oven cure them right away or can i wait some time…
opps forgot one more i see that i can use on plastic champagne glasses too…
I just made a glass last night…..did the glitter on your glasses come out smooth or does it feel a little rough?
Hi Tiffany! It’s definitely not smooth like glass… yes, a little bumpy. :)
I found this on Pinterest and can’t wait to make them this weekend for a friend who is having me as a weekend guest in a few weeks! I want to also try the non-glitter Martha paints. Do you have any experience with them? Would they work/cure the same way?
Okay, I have a silly question. Is it safe to cure these in a gas oven rather than an electric oven?
Hi Kayla! Either type is fine!
I made my version!!! My finished pictures are on my blog, with a link back to you here for the instructions!! Thank you for this wonderful tutorial and the inspiration to make my own for my wedding this summer!! I had so much fun and it was really easy to do!
Where did you buy the Martha Stewart glitter paint?
Michaels!
Thanks!
I used your techniques with the Frost Etching Effect tinted with pink and they turned out amazing! Thanks for the clear instructions.
-S
I love, love, love this DIY! I have plans to use it for various drinking glasses but used this tutorial to spruce up my make up brush holders (seen here: http://www.sprinklesandstyle.com/2012/05/diy-glitter-makeup-brush-holders.html). Thanks so much for sharing Jen!